Dynamic inventories
Refresh hosts from a cloud provider or a repository inventory file, check what was found, then use those stored hosts in an Ansible job. Choose how the inventory should refresh before later launches.
Before you start
You need access to the inventory and permission to manage it: inventory write for a project-scoped inventory, or organization Ansible management for an organization-scoped one. Creating a new inventory also requires organization Ansible management. Reading sync history requires organization Ansible read permission. A visible button alone does not establish that your account can perform the operation.
The platform runner must reach the repository and cloud APIs and have the required Ansible inventory plugin and authentication available. Inventory discovery runs on platform infrastructure, even when the eventual job uses a self-hosted agent pool. Choose a credential or identity with read access to the resources you intend to discover.
For the cloud examples below, scope that access to the resources you need:
| Provider | Discovery access |
|---|---|
| AWS | ec2:DescribeInstances; region enumeration can also require ec2:DescribeRegions. |
| Azure | The Reader role on the target subscription or resource groups. |
| GCP | compute.instances.list on each target project. |
Choose where configuration lives
VCS versus cloud source chooses where discovery settings live. UI, API and Terraform choose how you register and manage that definition; they are not competing inventory types. Use the UI steps below, API requests, or Terraform/OpenTofu definitions. All three paths still need a successful discovery and a host-set check.
| Use | When to choose it | Where discovery settings live |
|---|---|---|
| VCS inventory | Review plugin configuration in Git, including provider filters, hostnames and grouping. | A plugin YAML file in the selected repository and branch. |
| Dynamic inventory with cloud sources | Combine sources with their own credentials and refresh settings. | Each source's configuration. Use the API for provider-specific settings the form does not expose. |
The cloud-source form does not expose regions, GCP projects, Azure subscription/resource
groups or a general plugin configuration editor. Its generic hostname and grouping
controls are not used by the current cloud configuration generators. Configure those
settings through VCS YAML or the source API config before relying on them.
Custom Script appears in the source selector but its sync implementation is incomplete. Use a supported cloud source or a VCS inventory file.
Understand the refresh
flowchart LR
    A["Start sync"] --> B["Read file or source config"]
    B --> C["Discover hosts and groups"]
    C --> D["Store successful result"]
    D --> E["Check Hosts and Syncs"]
    E --> F["Launch job with stored hosts"]
What each step does
The platform runner reads the repository file or generates a plugin file from the cloud source configuration. It runs Ansible's inventory discovery and records the result. Jobs use the stored hosts and variables. Refreshing them is a separate operation, which can also run automatically before a job when update on launch is enabled.
Use a repository plugin file
- Commit an inventory plugin file to a repository connected to your organization. Use the filename suffix required by the plugin.
- Open Inventories > New Inventory. Enter a name, choose VCS, then select the connection, repository, branch and Inventory Path. The connection selector offers GitHub and Azure DevOps connections. Register repository access as a VCS connection, rather than as an Ansible credential.
- Select Create Inventory, open it, and select Sync from VCS.
- Check the completed sync and discovered hosts before selecting the inventory in a job template.
Repository-backed discovery uses your file and the platform runner's environment for cloud authentication. Attaching a cloud credential to a separate dynamic source does not authenticate a VCS inventory. For Azure, this path does not mint Stackweaver OIDC inventory tokens; arrange runtime identity or plugin authentication with your operator. Keep secrets out of the repository.
Plugin YAML examples
| Provider | Plugin | Required filename ending |
|---|---|---|
| AWS | amazon.aws.aws_ec2 | aws_ec2.yml or aws_ec2.yaml |
| Azure | azure.azcollection.azure_rm | azure_rm.yml or azure_rm.yaml |
| GCP | google.cloud.gcp_compute | gcp_compute.yml, gcp_compute.yaml, gcp.yml or gcp.yaml |
A provider icon is a UI hint, not proof that Ansible accepts the filename. These filename requirements come from the AWS, Azure and GCP plugin references; use those references for additional options and dependencies.
Save one of these files in your repository, replacing the example region, resource group
or project with your own scope. The AWS example selects running production instances;
Azure lists VMs in rg-production; GCP lists instances in the named project and zone.
Authentication must already be available to the platform runner as described above.
AWS: inventory/production.aws_ec2.yml
plugin: amazon.aws.aws_ec2
regions:
  - eu-west-1
filters:
  instance-state-name: running
  tag:Environment: production
keyed_groups:
  - key: placement.region
    prefix: region
Azure: inventory/production.azure_rm.yml
plugin: azure.azcollection.azure_rm
auth_source: auto
include_vm_resource_groups:
  - rg-production
hostnames:
  - name
keyed_groups:
  - key: location
    prefix: region
GCP: inventory/production.gcp_compute.yml
plugin: google.cloud.gcp_compute
auth_kind: application
projects:
  - my-project-id
zones:
  - us-central1-a
keyed_groups:
  - key: labels.env
    prefix: env
For Azure managed identity, use auth_source: msi instead of auto. Give that identity
read access to the target subscription/resource groups. For GCP, application uses
Application Default Credentials available on the platform runtime; it does not attach a
Stackweaver credential to a VCS inventory. After syncing, check Hosts and Groups
for the intended scope before using it in a job.
The file picker hides playbooks, roles, variables, tests, hidden directories and tooling files. If no candidates are found, it offers a typed path. If other candidates appear but yours is missing, check the repository and branch, then use the inventory registration operation in the API explorer. Not every picker accepts an arbitrary path.
Add a cloud source
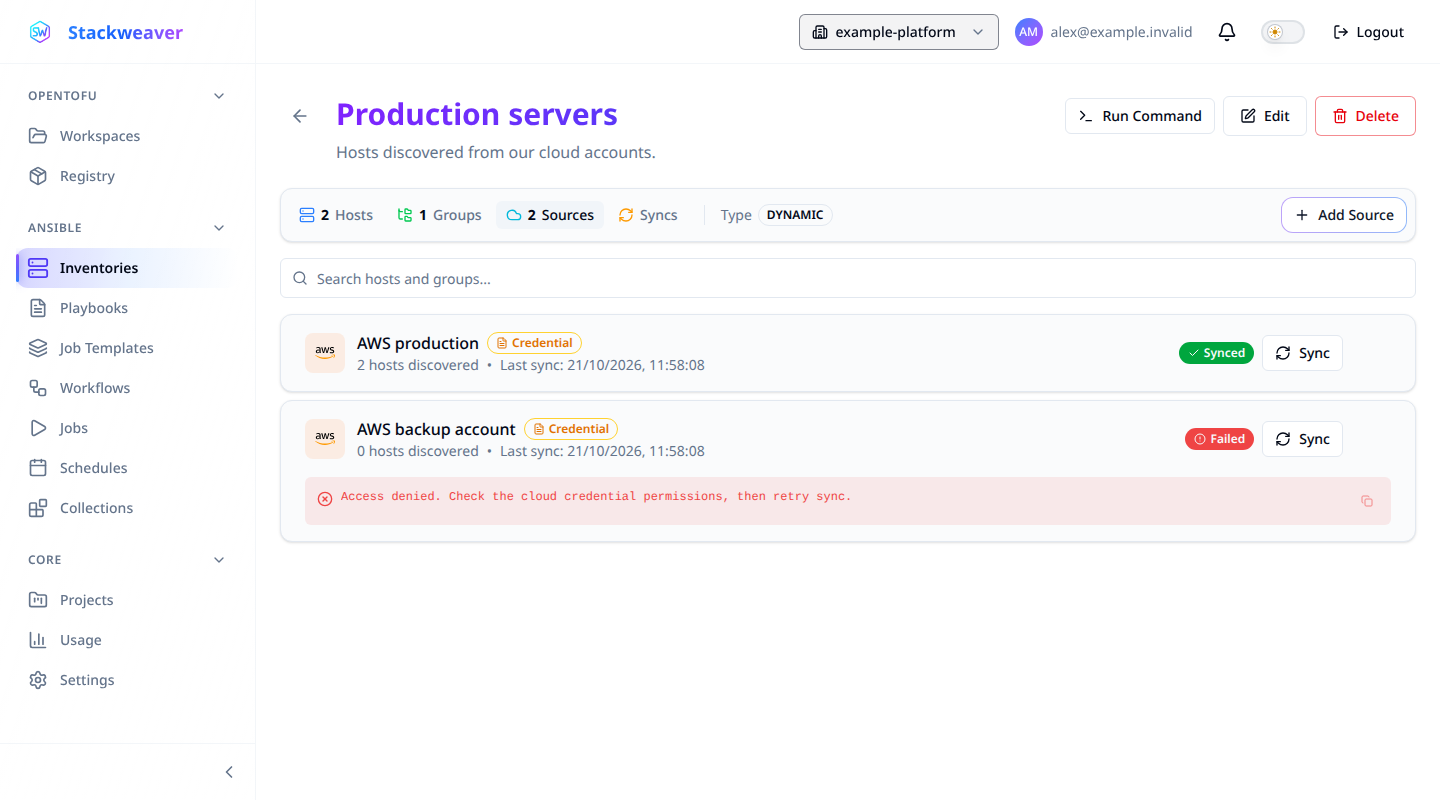
- Open Inventories > New Inventory, enter a name, select Dynamic, and create it.
- Open Sources > Add Source. Enter the source name and choose Source Type.
- Choose a matching Cloud Credential, or use an operator-configured runtime identity. Azure also has an Authentication Method selector; see the table below.
- Scroll through the form to check refresh and overwrite settings, then select Add Source.
- Configure any required provider scope through the API before the first sync. GCP sources
need a
projectslist; the form cannot supply it. - Select Sync on the source and verify the result under Hosts and Syncs.
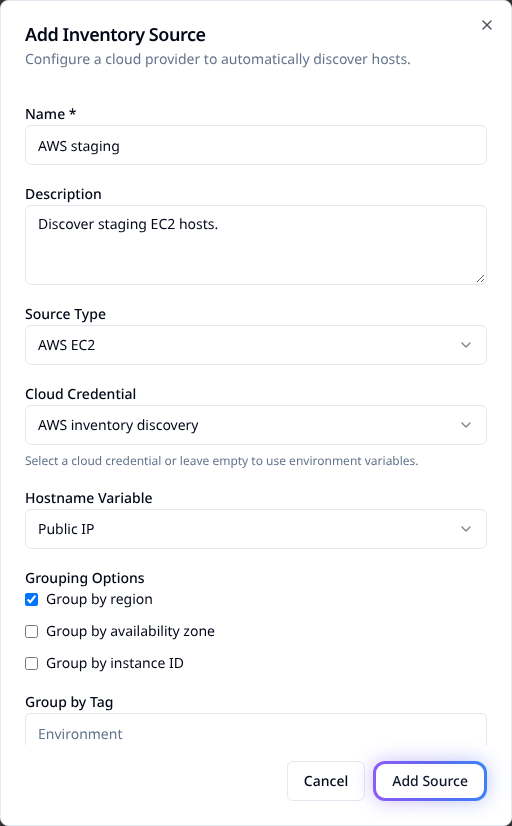
Hostname Variable and Grouping Options are visible in this form, but the current
cloud generators do not consume those generic controls. Set provider-specific rules in
VCS YAML or source API config.
Credentials must belong to the inventory's organization and match the provider type. None (use environment) works only when a suitable identity is already available to the platform runner. It is not automatic federation for every provider.
For a recurring source sync, create the source first, then use Edit > Sync Schedule and save. The schedule selected in the new-source form is not retained by creation.
Choose Azure source authentication
This table applies to an Azure cloud source. A VCS inventory follows its repository file and runtime configuration instead.
| Authentication method | Required setup |
|---|---|
| Managed Identity | A managed identity reachable through the platform runner's Azure metadata endpoint. For a user-assigned identity, supply its client ID. |
| Workload Identity | An AKS runtime with a projected workload-identity token and the runner's workload identity enabled. |
| OIDC Federation | Organization Azure OIDC configuration, signing/issuer setup, and a federated credential matching this source. Entra must reach the issuer's discovery and JWKS endpoints publicly with trusted TLS. |
| Cloud Credential | An Azure service-principal credential attached to the source. Outbound authentication works without a public Stackweaver issuer. |
OIDC Federation uses the subscription in the organization's Azure OIDC configuration.
For the other source authentication modes, supply subscription_id through source API
config. On a private deployment,
use a runtime identity or a cloud credential when the Stackweaver issuer is not public.
Read OIDC operator configuration before
choosing Stackweaver federation.
Configure the Azure federation subject
For a source using Stackweaver OIDC Federation, configure its federated credential with
the deployment's issuer, audience api://AzureADTokenExchange, and this subject:
organization:<org>:project:<project>:inventory:<source-name>:sync
Use the source name, not the enclosing inventory name. Use the inventory's project
name, or default for an organization-scoped inventory without a project. Renaming or
changing this scope requires a matching identity configuration.
This subject is not the authentication contract for a VCS inventory. For Azure VCS
workload identity, the runner resolves the subscription from the file's subscription_id,
then the organization's Azure OIDC configuration, then its inherited AZURE_SUBSCRIPTION_ID.
The operator configures the runtime identity. The inventory file remains authoritative.
AWS sources can use an attached AWS credential or a runtime AWS identity. GCP sources use Application Default Credentials, from an attached service-account key or the platform's runtime identity. VMware sources need matching provider authentication. Do not store cloud secrets in plugin YAML or copy them into sync logs.
Configure a source through the API
Use these requests when you need provider settings the form cannot supply. You need
curl, jq, the permissions listed above, and an existing AWS credential in the same
organization. Set STACKWEAVER_TOKEN to an authorized API token through your normal
secret handling. Replace the hostname, organization URL name and credential UUID below.
Creating a source registers its configuration; it does not prove discovery works. The sync request queues work and returns before discovery finishes. Keep overwrite off until you have checked the result.
Create, sync and verify an AWS source
Run this in Bash in an empty example directory. It writes inventory.json and source.json;
neither file contains the credential's secret, only its ID.
export STACKWEAVER_URL="https://stackweaver.example.com"
export STACKWEAVER_ORG="my-org"
export AWS_CREDENTIAL_ID="<existing-aws-credential-uuid>"
: "${STACKWEAVER_TOKEN:?Set an authorized Stackweaver API token}"

cat > inventory.json <<'JSON'
{"data":{"type":"inventories","attributes":{
  "name":"production","inventory-type":"dynamic"
}}}
JSON

INVENTORY_ID=$(curl --fail-with-body --silent --show-error \
  -H "Authorization: Bearer $STACKWEAVER_TOKEN" \
  -H 'Content-Type: application/vnd.api+json' \
  --data-binary @inventory.json \
  "$STACKWEAVER_URL/api/v2/organizations/$STACKWEAVER_ORG/ansible/inventories" \
  | jq -er '.data.id')

jq -n --arg credential "$AWS_CREDENTIAL_ID" '{data:{
  type:"inventory-sources", attributes:{
    name:"aws-production", "source-type":"aws", "credential-id":$credential,
    config:{
      regions:["eu-west-1"],
      filters:[{name:"tag:Environment",values:["production"]}],
      group_by_region:true
    },
    "update-on-launch":true, "update-cache-timeout":300,
    overwrite:false, "overwrite-vars":false
  }
}}' > source.json

SOURCE_ID=$(curl --fail-with-body --silent --show-error \
  -H "Authorization: Bearer $STACKWEAVER_TOKEN" \
  -H 'Content-Type: application/vnd.api+json' \
  --data-binary @source.json \
  "$STACKWEAVER_URL/api/v2/ansible/inventories/$INVENTORY_ID/sources" \
  | jq -er '.data.id')

curl --fail-with-body --silent --show-error -X POST \
  -H "Authorization: Bearer $STACKWEAVER_TOKEN" \
  "$STACKWEAVER_URL/api/v2/ansible/inventory-sources/$SOURCE_ID/actions/sync"

# Repeat this read until status is successful or failed.
curl --fail-with-body --silent --show-error \
  -H "Authorization: Bearer $STACKWEAVER_TOKEN" \
  "$STACKWEAVER_URL/api/v2/ansible/inventory-sources/$SOURCE_ID" \
  | jq '.data.attributes | {status, hosts: .["hosts-count"], error: .["last-sync-error"]}'

curl --fail-with-body --silent --show-error \
  -H "Authorization: Bearer $STACKWEAVER_TOKEN" \
  "$STACKWEAVER_URL/api/v2/ansible/inventories/$INVENTORY_ID/hosts"
A successful result has status: "successful" and the expected host count. If the result
is failed or unexpectedly empty, inspect the error and scope before launching a job.
The hosts endpoint is paginated; follow meta.pagination.next-page when reading all hosts.
Update scope, schedule or authentication
Save this as source-update.json to keep the existing AWS discovery scope and add an
hourly sync. A config update replaces the whole configuration object, so include
any filters and grouping you want to keep.
{
  "data": {
    "type": "inventory-sources",
    "attributes": {
      "config": {
        "regions": ["eu-west-1"],
        "filters": [{"name": "tag:Environment", "values": ["production"]}],
        "group_by_region": true
      },
      "sync-schedule": "0 * * * *",
      "update-cache-timeout": 300
    }
  }
}
curl --fail-with-body --silent --show-error -X PATCH \
  -H "Authorization: Bearer $STACKWEAVER_TOKEN" \
  -H 'Content-Type: application/vnd.api+json' \
  --data-binary @source-update.json \
  "$STACKWEAVER_URL/api/v2/ansible/inventory-sources/$SOURCE_ID"
The response contains the saved source. Queue another sync to apply changed discovery
settings to stored hosts. Set sync-schedule to an empty string to remove the schedule.
For an Azure or GCP source, create a separate source with source-type: "azure" or
"gcp" and use the corresponding object below as its config. Attach a matching
credential, or omit credential-id for a suitable runtime identity. The Azure example
uses managed identity, so it has no attached credential.
Azure managed identity: config
{
  "auth_method": "managed_identity",
  "subscription_id": "<azure-subscription-uuid>",
  "resource_groups": ["rg-production"],
  "group_by_resource_group": true
}
GCP: config
{
  "projects": ["my-project-id"],
  "zones": ["us-central1-a"],
  "group_by_zone": true
}
Azure accepts auth_method values managed_identity, workload_identity, oidc and
credential. Use managed_identity_client_id only with managed_identity. Stackweaver
OIDC uses the organization's OIDC subscription as described above. When switching an
existing Azure source away from a stored credential, send credential-id: "" alongside
the complete new config. Updating source-type does not change an existing source's
provider; create a separate source instead.
For VCS inventories and constructed rebuilds, trigger a sync with the first operation below and no request body. The other operations read history and a run's captured output. Replace the inventory and sync IDs with your own values.
POST /api/v2/ansible/inventories/<inventory-id>/actions/sync
GET /api/v2/ansible/inventories/<inventory-id>/syncs
GET /api/v2/ansible/inventory-syncs/<sync-id>
Use the API explorer for complete request schemas.
Manage the definition with Terraform or OpenTofu
The Stackweaver provider
has native inventory
and inventory source
resources. Choose this path instead of the API creation example for the same objects.
Save this as main.tf, replace the hostname and organization, and supply
an existing AWS credential UUID as TF_VAR_aws_credential_id. Authenticate the provider
with TFE_TOKEN through your normal secret handling.
terraform {
  required_providers {
    stackweaver = {
      source = "vhco-pro/stackweaver"
    }
  }
}

provider "stackweaver" {
  hostname = "stackweaver.example.com"
}

variable "aws_credential_id" {
  type = string
}

resource "stackweaver_ansible_inventory" "production" {
  organization = "my-org"
  name         = "production"
  type         = "dynamic"
}

resource "stackweaver_ansible_inventory_source" "aws" {
  inventory_id         = stackweaver_ansible_inventory.production.id
  name                 = "aws-production"
  source_type          = "aws"
  credential_id        = var.aws_credential_id
  update_on_launch     = true
  update_cache_timeout = 300
  overwrite            = false
  overwrite_vars       = false
  sync_schedule        = "0 * * * *"

  config = jsonencode({
    regions         = ["eu-west-1"]
    filters         = [{ name = "tag:Environment", values = ["production"] }]
    group_by_region = true
  })
}

output "inventory_id" {
  value = stackweaver_ansible_inventory.production.id
}

output "inventory_source_id" {
  value = stackweaver_ansible_inventory_source.aws.id
}
Run terraform init, then terraform plan -out=inventory.tfplan and review it before
terraform apply inventory.tfplan (or use the corresponding tofu commands). This creates
the inventory and source definitions, not a completed discovery. Use the source ID output
with the sync API request above, or select Sync on Sources, then verify the hosts.
For a repository-backed inventory, use this resource instead of the dynamic inventory and source pair above. Replace the VCS connection UUID and repository with your organization's connection and the repository containing the plugin file.
resource "stackweaver_ansible_inventory" "from_git" {
  organization      = "my-org"
  name              = "production-from-git"
  type              = "vcs"
  vcs_connection_id = "<existing-vcs-connection-uuid>"
  vcs_repository    = "my-org/automation"
  vcs_branch        = "main"
  inventory_path    = "inventory/production.azure_rm.yml"
}
Creating a VCS inventory queues an initial sync. Inspect its status and host set; use Sync from VCS or the inventory sync API to refresh subsequent repository changes.
The native resources use stackweaver_* names; there are no tfe_ansible_inventory aliases.
Use config = jsonencode(...) for supported provider options, rather than the ineffective
generic hostname/grouping fields. Change an existing definition in Terraform instead of
managing the same source through both Terraform and manual API updates.
Check a sync before using its hosts
- Wait for Synced, or read the failed source's error on Sources. A green state with zero hosts is not proof that authentication and scope are correct.
- Open Hosts and check the count, names,
ansible_hostand variables against the intended machines. Open Groups if your playbook targets generated groups. - Open Syncs and select the run. Check its trigger, counts, duration and captured output. Source and constructed builds can stream output while running; VCS output appears at completion.
- Select the inventory in your job template only after the host set is appropriate.
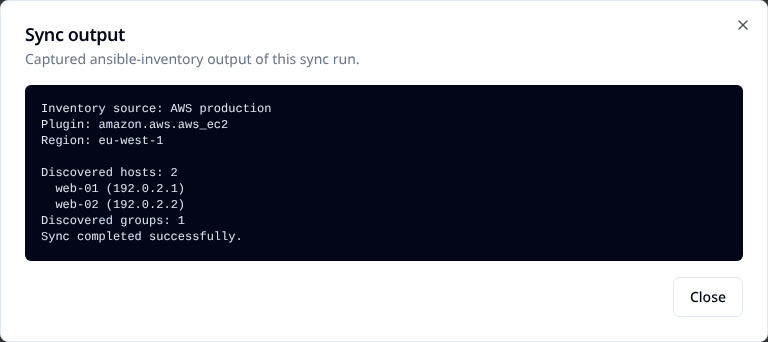
The page refreshes active sync status automatically. A local completion notification can stop waiting after about a minute; that does not cancel the sync. Return to Syncs for the final result. Warnings can accompany a successful discovery; read them before assuming the returned host set is complete.
Choose refresh and merge settings
These settings belong to individual cloud sources. A VCS inventory does not gain automatic Git refresh from this table: use Sync from VCS, then check its result before launching jobs that need repository changes. Constructed inventories have their own rebuild and cache behavior, described below.
| Setting | Effect |
|---|---|
| Update on launch | Enabled sources refresh before jobs use this inventory. A recent successful sync within the cache timeout can skip that refresh. The default is on. |
| Cache timeout | Seconds for which a successful source sync is considered fresh. Set it to 0 to refresh on every launch. |
| Overwrite | After a successful sync, remove hosts/groups owned by this source that disappeared from its result. A successful empty result can remove all of that source's rows. Failed discovery leaves them unchanged. |
| Overwrite variables | Replace a host's variables, including manually added keys. With it off, merge variables; synced values win on conflicting keys. |
| Sync verbosity | Increase diagnostic output when investigating a problem, then check Syncs. |
Avoid overlapping host/group names when sources must remain independent. Discovery can update an existing name and adopt a previously unowned row; a manually created name is not guaranteed protection from later overwrite pruning.
When an update-on-launch sync fails
A failed refresh does not fail the job automatically. The job is released and uses stored hosts from the last successful source sync. A sync still running after 30 minutes also stops holding the job. Check the job's inventory-refresh warning before trusting that its targets were freshly discovered.
The warning names each affected source, the failure and last successful refresh, or says that it has never synced and contributed no hosts. It appears above the job's tabs and at the start of its output on platform and self-hosted runners.
Refresh warnings in the API and notifications
The job API exposes inventory-sync-warnings, including each source's ID/name, failure,
and last-successful-sync-at (null when there is none). Notifications sent by the template
carry the warning in warnings and extra.inventory_sync_warnings. A channel subscribed
only to failures will not receive a successful job's warning. Check the job or sync history
when you need to establish which inventory was used.
Run an ad hoc command
- Select Run Command on the inventory, or the terminal action for one host.
- Choose a permitted module and arguments, the host limit, a machine credential and runner
destination.
commandandshellaccept free-form arguments; other modules use key/value pairs. - Run it and check the normal job page for output, events and results.
This requires ad hoc command permission, which is separate from template execution. The organization controls the module allowlist. Ad hoc jobs do not install repository Galaxy requirements. Verify the target limit before running a command that changes machines.
Build a constructed inventory
Choose Constructed when creating an inventory to derive hosts from other inventories
instead of querying a cloud. Select ordered inputs, optional compose, groups and
keyed_groups rules, and a host limit. Use Rebuild and inspect Syncs to verify it.
It also rebuilds before job launches, subject to its cache timeout.
Define constructed rules
Save as constructed-rules.yml and paste its contents into Constructed rules (YAML)
when creating or editing the constructed inventory. Select the AWS inventory as an input.
These rules use the ec2_tags and ec2_region variables produced by an AWS cloud source.
compose:
  deployment_region: ec2_region | default('unknown')
groups:
  production: (ec2_tags | default({})).get('Environment', '') == 'production'
keyed_groups:
  - key: ec2_region | default('unknown')
    prefix: region
The build adds a production group for tagged hosts, a region_... group per region and
a deployment_region host variable. Set Limit to production if only those hosts
should remain in the result. Leave it empty to keep all input hosts.
With the Terraform definition above, add this resource to main.tf and keep
constructed-rules.yml beside it:
resource "stackweaver_ansible_inventory" "production_hosts" {
  organization        = "my-org"
  name                = "production-hosts"
  type                = "constructed"
  input_inventory_ids = [stackweaver_ansible_inventory.production.id]
  source_vars         = file("${path.module}/constructed-rules.yml")
  constructed_limit   = "production"
}
Creation queues a build; wait for a successful result before using its hosts. It derives hosts from the stored input, so sync the AWS source first if that input has no hosts yet.
Through the API, create an inventory with inventory-type: "constructed", the rules as
the source-vars YAML string, and an ordered input-inventory-ids array. Terraform exposes
the same settings as type = "constructed", the source_vars file content and
input_inventory_ids. Neither path takes a cloud source on the constructed inventory.
Inputs must be in the same organization and cannot themselves be constructed inventories. The result is derived: edit input data or rules to change it. Manual host/group creation and source additions are blocked. Successful rebuilds replace the derived host set; failed builds retain the last successful result. A disabled/deleted derived host or deleted group can reappear on rebuild. Move any manually maintained entries to an input inventory before rebuilding if you need to preserve them.
Delete an inventory
Choose Delete and read the dependency message before confirming. An ordinary delete can be blocked by templates, jobs, sources or constructed inputs that reference it.
Force Delete Everything removes the inventory and dependent sources, templates, schedules, jobs/events and affected workflow steps. Constructed inventories lose this input. This is irreversible and requires organization Ansible management permission. Keep the inventory if you need its dependent records and history.
To delete through the API, use:
DELETE /api/v2/ansible/inventories/<inventory-id>
For the destructive cascade, add ?force=true to that endpoint. An ordinary delete
returns 409 Conflict while dependencies block it. The API force request acts immediately;
it does not show the UI confirmation.
Troubleshooting
| Symptom | Check next |
|---|---|
| Authentication fails | Credential provider/organization, expiry, runtime identity and cloud permissions. For Azure federation, also verify issuer, audience and the source-name subject. |
| Success with no hosts | Provider scope and filters. Set explicit GCP projects; no projects can produce a successful sync that contacts nothing. |
| Hosts disappear after sync | Overwrite, successful empty results and overlapping host/group names. Review the source's output before retrying. |
| A plugin warning appears | Read the captured output in Syncs. An amber indicator can accompany a successful result. Check options against the installed collection's documentation. |
azure_cloud is undefined | Ask the operator to check the custom runner image's Azure collection dependencies, including azure-cli-core. Rebuild the image with its required dependencies. |
| Desired grouping, hostname or region control is absent or ineffective | Use VCS plugin YAML or source API config; the generic form fields do not configure those provider options. |