Run your first Ansible job
Run a small playbook that prints a message on the runner. You will register a repository playbook and inventory, create a reusable job template, launch it and inspect its result. This example uses no cloud resources and needs no target SSH credential.
Before you start
You need an account, an organization/project where you can manage Ansible resources, a connected VCS repository and available Ansible execution capacity. Set up GitHub or Azure DevOps first if your project cannot select a repository.
The organization-level creation screens use the organization's project selection/defaults;
check where the created objects appear. The Terraform alternative below supplies project_id
explicitly.
The localhost in this example is the runner, not your laptop. Keep the sample task
read-only. To manage another host later, the chosen runner needs network access and the
appropriate SSH/cloud credentials.
1. Commit a playbook and inventory
Add these files to a repository you control and commit them to the branch you will select.
Save the playbook as playbooks/hello.yml:
---
- name: First Stackweaver job
  hosts: demo
  connection: local
  gather_facts: false
  tasks:
    - name: Show the greeting
      ansible.builtin.debug:
        msg: Hello from Stackweaver
Save the inventory as inventory/demo.yml:
all:
  children:
    demo:
      hosts:
        localhost:
          ansible_connection: local
The inventory's demo group matches the playbook's hosts: demo. These are Ansible files;
committing them does not register platform objects by itself.
2. Register the playbook
- Open the organization's Ansible > Playbooks, choose New Playbook and name it
hello. - Select the VCS connection, repository, branch and
playbooks/hello.yml. - Keep Source in cached mode for this example, then save and sync the playbook.
- Check that the recorded sync succeeds and its commit is the one you intended.
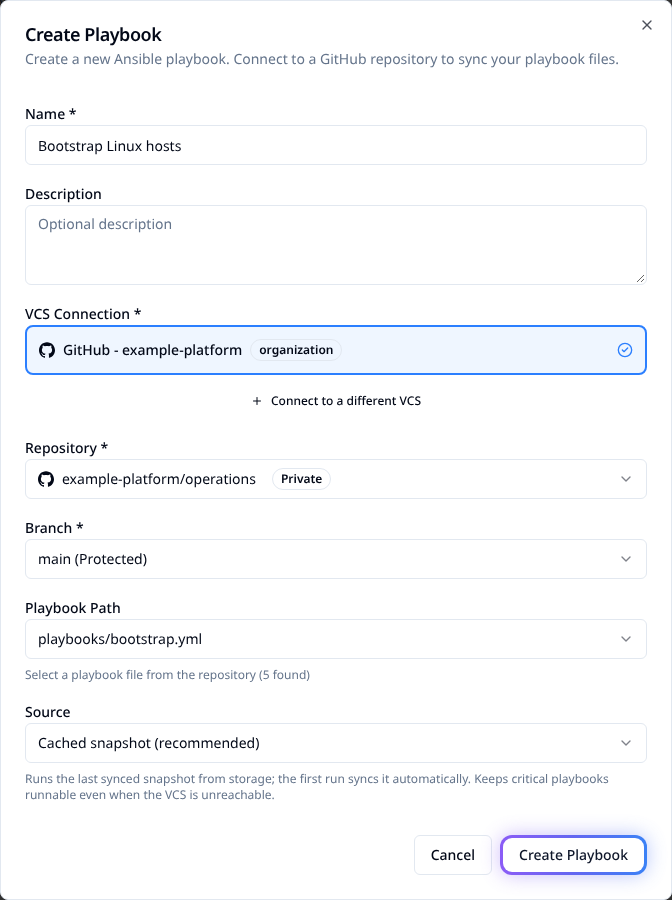
The image shows example values; use your repository and hello.yml path. Cached mode runs
from a captured snapshot. Fresh mode clones at execution time and needs VCS availability.
Platform and self-hosted runner fallback behavior can differ when a snapshot is missing;
see Manage playbooks
before relying on that case.
3. Register and sync the inventory
In Ansible > Inventories, choose New Inventory, select VCS, and select the same
connection, repository and branch with inventory/demo.yml as the path. Save, sync and check
that the host localhost and group demo are present before launching.
For a hand-maintained static inventory instead, create a Static inventory, open it and use Add Host to enter host names/addresses. Add the intended group and membership before using a playbook that targets it. The static creation dialog is not an INI-file import field. For a normal remote-host inventory, an equivalent Ansible INI file looks like this:
[web]
web1 ansible_host=192.0.2.10
web2 ansible_host=192.0.2.11

[db]
db1 ansible_host=192.0.2.20
Those are documentation addresses, not reachable test targets. Use real addresses and suitable credentials when you move beyond the local example. For discovered hosts, use Dynamic inventories.
4. Create and launch a job template
- Open Job Templates > New Job Template.
- Name it
hello, then choose your registered playbook and synced inventory. - Leave SSH credentials empty for this local debug task. Start with verbosity 0 and
becomedisabled. After creation, use the template's Edit > Timeout (seconds) if you need a timeout. - Save and open the template. Check its playbook, inventory and project before choosing Launch.
- Review the launch limit/tags/extra variables, then choose Launch Job.
The launch dialog starts with the template's values. Overrides affect only this execution; emptying a limit/tag field clears it for this run. Extra variables use JSON in this dialog. A successful launch creates a job; wait for its terminal result before calling it successful.
flowchart LR
    R["Repository playbook"] --> T["Job template"]
    I["Synced inventory"] --> T
    C["Credentials when required"] --> T
    T --> J["Launch and execute"]
    J --> O["Review host/task results"]
Terraform or OpenTofu alternative
Use this instead of manually registering duplicate objects. Configure the
Stackweaver provider, an existing project and VCS
connection first. In a separate management directory, save the following as main.tf.
Supply your repository as owner/repository; this example uses branch main.
The connection ID is Stackweaver's connection UUID, not GitHub's numeric installation ID
or a token secret. With STACKWEAVER_API_URL, STACKWEAVER_TOKEN and ORG set, read IDs:
curl --fail-with-body --header "Authorization: Bearer $STACKWEAVER_TOKEN" \
  "$STACKWEAVER_API_URL/api/v2/organizations/$ORG/projects"
curl --fail-with-body --header "Authorization: Bearer $STACKWEAVER_TOKEN" \
  "$STACKWEAVER_API_URL/api/v2/organizations/$ORG/vcs-connections"
Choose the intended data entry by name/repository access and use its id. Set the variables
through a .tfvars file or TF_VAR_* environment inputs before planning:
variable "project_id" {
  type = string
}
variable "vcs_connection_id" {
  type = string
}
variable "repository" {
  type = string
}

resource "stackweaver_ansible_inventory" "demo" {
  organization      = "my-org"
  project_id        = var.project_id
  name              = "demo"
  type              = "vcs"
  vcs_connection_id = var.vcs_connection_id
  vcs_repository    = var.repository
  vcs_branch        = "main"
  inventory_path    = "inventory/demo.yml"
}

resource "stackweaver_ansible_playbook" "hello" {
  project_id        = var.project_id
  name              = "hello"
  vcs_connection_id = var.vcs_connection_id
  vcs_repository    = var.repository
  vcs_branch        = "main"
  playbook_path     = "playbooks/hello.yml"
  source_mode       = "cached"
}

resource "stackweaver_ansible_job_template" "hello" {
  organization    = "my-org"
  project_id      = var.project_id
  name            = "hello"
  inventory_id    = stackweaver_ansible_inventory.demo.id
  playbook_id     = stackweaver_ansible_playbook.hello.id
  verbosity       = 0
  become_enabled  = false
  timeout_seconds = 300
}
Add an output so you can read the created template ID for the API launch below:
output "template_id" {
  value = stackweaver_ansible_job_template.hello.id
}
After applying, terraform output -raw template_id returns that value.
Replace my-org with the provider's organization and use resources from that same organization.
Run terraform init, terraform plan and, after reviewing the plan, terraform apply
(or the corresponding tofu commands). Check the inventory/playbook syncs before launching.
Provider apply creates platform configuration; it does not prove the Ansible task has run.
For remote targets, create the right credential and attach it with the credential-attachment resource shown below; storing it alone does not attach it to a template.
stackweaver_ansible_job_template_credential
Use the execution guide for that complete path.
Launch through the API
With a permitted token, set STACKWEAVER_API_URL to the server origin, STACKWEAVER_TOKEN
through a secret store and TEMPLATE_ID to the created template ID. A bodyless request uses
its saved launch settings:
curl --fail-with-body --request POST \
  --header "Authorization: Bearer $STACKWEAVER_TOKEN" \
  "$STACKWEAVER_API_URL/api/v2/ansible/job-templates/$TEMPLATE_ID/launch"
A 403 can mean the token can manage configuration but lacks permission to execute jobs
in this template's project. Correct that permission before retrying.
Record the returned job ID. Read GET /api/v2/ansible/jobs/<job-id> and its /output endpoint
for status/output. See the API viewer for the full contract and the
execution guide for JSON
launch overrides. There is no released Stackweaver CLI equivalent documented for this task.
5. Read the result
The Run tab's matrix has hosts as rows and tasks as columns. This example should report
one successful host and a task result containing Hello from Stackweaver, with no failed or
unreachable hosts. A task can report changed without making the overall job a "changed"
terminal status; inspect both the job status and recap.
| Result | Visual cue |
|---|---|
| Successful | Green check. |
| Changed | Amber refresh. |
| Failed | Red alert. |
| Unreachable | Magenta bolt. |
| Skipped | Cyan ban. |
| Not run | Faint dot. |
Click a cell for the module result, output and diff; a host name shows its task history, and
a task column shows results across the fleet. Timeline explains duration; Stream shows
chronological events with expandable raw data. Its Raw toggle shows runner output.
Use the legend as a status filter and the search for host, task or result text. Press / to
focus search. Drag a task-column edge to read a long name and double-click to reset its width.
The copy control beside search copies raw output.
For remote-host work, attach an SSH credential and ensure the runner can reach each host. Use a vault credential for encrypted playbook data, and cloud credentials for provider access. Credential access is permission-controlled; inventory variables are not a substitute for a secret store. A sudo task also needs target-side privilege escalation configured.
Recover from a failed first run
| Symptom | Check |
|---|---|
| No hosts matched | demo exists in the synced inventory and matches the playbook; no launch limit excludes it. |
| Job stays queued | The template's selected platform runner or agent pool has available execution capacity. |
| Playbook missing | Repository, branch, path and sync/snapshot status. |
| Remote host unreachable | Host address, routing/firewall, SSH port and selected credential. |
| Permission denied | SSH user/key and target sudo rights; do not add become to the local tutorial to mask a problem. |
For a failed inventory or playbook sync, open its sync status/log, correct repository access or the path/branch, and sync again. Confirm the expected hosts and commit before relaunching.
For the next task, read Manage playbooks, repository-push sync or the canonical Ansible catalogue.